1. Installation process(fresh install):
- write a fresh image with the latest RaspbianOS image from http://www.raspberrypi.org/downloads/
- copy the carpc folder in /home/pi/ on the SD card(get the latest release archive from my Downloads page/updates)
- plug the image in RPI, connect an USB keyboard and start it
--- use the auto menu to expand file system
--- change user password
--- enable ssh, disable overscan, disable serial messages
--- change Internalisation Options -> Locale and Timezone to your country
--- expand disk size to at least 4GB
--- enable Boot to Console(mandatory)
- restart
- type cd /home/pi/carpc/ and then ./carpc-install.sh and then wait for the system to install
- after this, you should reboot(sudo reboot) and the system should start
2. Calibrate the touch screen
Forget about xinput-calibrator and X11 calibration metods.
If you have calibration file(/home/pi/touchscreen_axes_calib) from a previous installation you can use it(put it in /home/pi/).
If you don't, then use the touch screen calibration plugin. This plugin works if you set correctly the Raspberry PI resolution in /boot/config.txt. Follow the steps in this video.
3. Add a map for navigation
Go to Navit Planet Extractor and download a .bin file for your area.
Copy the .bin file in your RPI card in /home/pi/.navit/ folder. Rename the .bin file to map1.bin.
4. Setup the GPS receiver
Open the file /home/pi/startup/StartCarPC and find the line gpsd /dev/ttyAMA0
Replace /dev/ttyAMA0 with your gps device file name. Here is how to find the file name:
1. For USB devices. After plugging the device into the usb port type dmesg and you should see somewhere that a new device was mapped on /dev/tty... Most probably the file name would be /dev/ttyACM0.
2. For Serial(UART) modules, using UART TX/RX pins the device will have the file name /dev/ttyAMA0.
You can test that the device is connected to a file name by calling cat /dev/ttyAMA0, for example and you should see some NMEA output.
5. Voice configuration for Navit
Each time a road indication has to be made, Navit will execute the file /home/pi/.navit/speech.sh with the indication text. This file will play a sound and the speak the indication, through speakers.
aplay -r 44100 /home/pi/.navit/notification3.wav & sleep 0.7 && espeak -ven+f4 -s150 -a 150 -p 50 "$1" --stdout | aplay
/home/pi/.navit/notification3.wav - the sound that will be played each time before an indication
-ven+f4 - female voice number 4
-s150 - speed 150 words per minute
-a150 - amplitude
-p50 - pitch
You can find more settings in the espeak manual
If you don't want the voice guidance you can press the speaker button in Navit and it will be turned off.
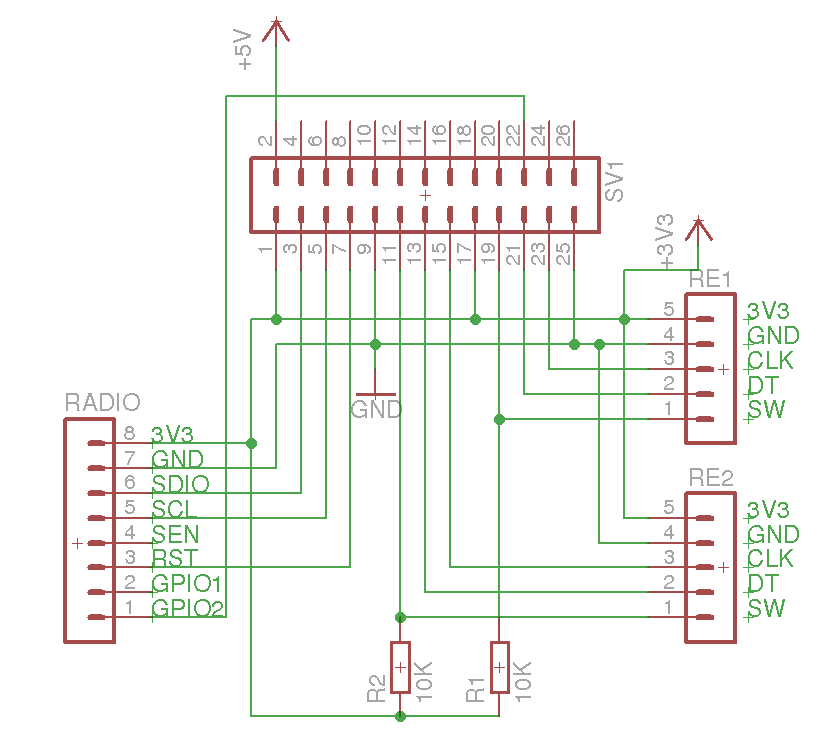
6. Add FM Radio module, physical buttons or physical rotary encoders
Here is my hardware schematic containing:
- SV1 - Raspberry PI B, B+ connector
- RADIO - SI4703 breakout board
- RE1 and RE2 - two rotary encoders
 | |
| CarPC hardware set-up example |
7. Configure the Controller
Modify the configuration file(/home/pi/config/gpio_description) like in this post.
8. Set the car logo in the Home screen
Put your car logo .png image in /home/pi/config/logo.png.
9. Skin
Thanks to Doru we have CarPC-touch_carbon.
10. Issues
The forum is available for any issues/suggestions.
Have fun!
Andrei